Crispy Garlic Parmesan Baked Shrimp (Ready in 20 Minutes)

These crispy garlic parmesan baked shrimp are the kind of recipe that makes people think you spent way longer in the kitchen than you actually did. Golden, crunchy breadcrumbs on top. Juicy, tender shrimp underneath. A butter-garlic base that perfumes the entire kitchen the second the oven door opens. And the best part? It's all done in 20 minutes flat.

This post may contain affiliate links. Please read my disclosure policy.

garlic parmesan baked shrimp - Spoonista

This recipe became our Friday night alternative to takeout about two years ago, and honestly, we never looked back. I remember standing in the kitchen at 6 PM, staring into the fridge after a genuinely exhausting week, with absolutely zero interest in cooking anything complicated. There was a bag of shrimp in the freezer, a wedge of parmesan, and half a lemon sitting on the counter — and something just clicked.

I tossed everything together, slid it into a hot oven, and 18 minutes later the whole apartment smelled incredible. My partner walked in mid-bake, stopped in the doorway, and said, “Wait — are we actually not ordering food tonight?” That kind of reaction, from that person, on that kind of Friday? That’s when I knew this recipe was a keeper. It’s been in our regular rotation ever since, and I’ve probably made it two dozen times since then, tweaking it here and there until it hit that perfect sweet spot of crispy, buttery, garlicky, and ridiculously easy.

Why You'll Love This Recipe

Health & Nutrition: Shrimp is one of the leanest, most protein-dense seafood options out there — a 4-ounce serving delivers roughly 24 grams of protein for under 120 calories before any additions. It’s rich in selenium, iodine, and B12, making it genuinely nourishing as a weeknight dinner rather than just a treat. The olive oil and parmesan add healthy fats that keep you satisfied, and because this is baked (not deep-fried), you’re getting that crunch without a heavy oil load.

Flavor & TextureHere’s what makes this dish so irresistible: the contrast. The shrimp themselves stay plump and juicy — almost sweet — while the parmesan-panko crust on top turns deeply golden and crisp in the oven’s high heat. Add roasted garlic hitting the butter base, a whisper of lemon zest, and a pinch of red pepper flakes for that barely-there heat, and you’ve got a dish that tastes genuinely layered and intentional. It’s savory, buttery, bright, and a little nutty from the cheese. Every single bite.

Practical BenefitsTwenty minutes. One baking dish. Minimal cleanup. This recipe is almost offensively easy for how impressive it looks — which makes it equally suited to a low-effort Tuesday dinner and a dinner party appetizer where you want people to be genuinely impressed. The ingredients are all pantry staples (plus fresh shrimp, which you can absolutely keep frozen and thaw quickly under cold water), and the whole dish scales beautifully for two people or twelve.

Ready to make magic in your kitchen? Here’s exactly how!

Print
clock clock iconcutlery cutlery iconflag flag iconfolder folder iconinstagram instagram iconpinterest pinterest iconfacebook facebook iconprint print iconsquares squares iconheart heart iconheart solid heart solid icon
garlic parmesan baked shrimp - Spoonista

Crispy Garlic Parmesan Baked Shrimp (Ready in 20 Minutes)


5 Stars 4 Stars 3 Stars 2 Stars 1 Star

No reviews

Description

Juicy baked shrimp with a golden parmesan-panko crust, garlic butter, and lemon — ready in 20 minutes.


Ingredients

Scale
garlic parmesan baked shrimp ingridients

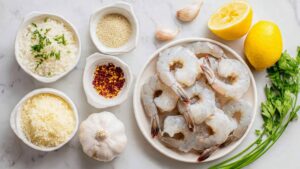
For the Shrimp Base:

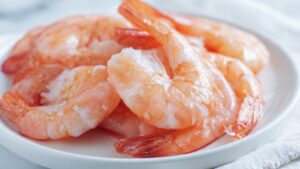
  • 1 1/2 pounds (680g) large raw shrimp (21-25 count), peeled and deveined, tails on or off
  • 3 tablespoons (45g) unsalted butter, melted
  • 2 tablespoons (30ml) extra-virgin olive oil
  • 6 cloves garlic, finely minced (about 2 tablespoons)
  • 1/2 teaspoon (2g) fine sea salt
  • 1/4 teaspoon (1g) freshly ground black pepper
  • 1/4 teaspoon (1g) red pepper flakes (adjust to taste; skip for mild)
  • 1 teaspoon (5ml) fresh lemon juice
  • 1/2 teaspoon (2g) lemon zest (from about half a lemon) Shrimp note: Fresh or frozen both work perfectly. If using frozen, thaw under cold running water for 5-7 minutes, then pat completely dry. Dry shrimp = crispier crust.

For the Parmesan Crust:

½ cup (50g) panko breadcrumbs (use gluten-free panko for GF version)

½ cup (50g) freshly grated Parmesan cheese (not the canned stuff — the real block makes a real difference)

2 tablespoons (8g) fresh flat-leaf parsley, finely chopped

1 tablespoon (15ml) extra-virgin olive oil

¼ teaspoon (1g) garlic powder

Pinch of fine sea salt

For Serving:

 
  • 1 lemon, cut into wedges
  • Extra fresh parsley, chopped
  • Flaky sea salt, for finishing (optional but highly recommended)
Instacart Get Recipe Ingredients

Instructions

  • Step 1: Prep the Oven and Shrimp

Prep the Oven and Shrimp

Preheat your oven to 425°F (220°C). While it heats, pat the shrimp completely dry using paper towels — press firmly but gently on both sides. This step is genuinely non-negotiable; any moisture on the surface will steam the shrimp instead of letting that crust crisp up. Arrange the dried shrimp in a single layer on a clean surface while you make the garlic butter base.

  • Step 2: Make the Garlic Butter Base

Make the Garlic Butter Base

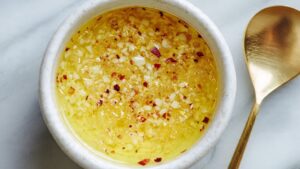
In a small bowl, whisk together the melted butter, olive oil, minced garlic, salt, black pepper, red pepper flakes, lemon juice, and lemon zest. The mixture should look glossy and smell intensely aromatic — all that raw garlic in warm butter is already doing its thing. Pour about two-thirds of this mixture into the bottom of your 9×13-inch baking dish, tilting the dish to coat the base evenly.

  • Step 3: Arrange the Shrimp

Step 3: Arrange the Shrimp

Place the dried shrimp in a single layer in the butter-coated baking dish, nestling them closely together but not overlapping — think of it like tucking them in, curved side down. Drizzle the remaining garlic butter mixture over the tops of the shrimp. Every shrimp should have a light coat of that butter and garlic. At this point, it already looks pretty good — but the magic is still coming.

  • Step 4: Mix the Parmesan Crust

Step 4: Mix the Parmesan Crust

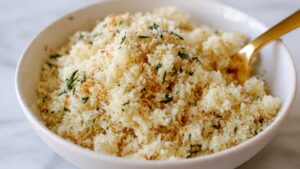
Instruction: In a separate small bowl, combine the panko breadcrumbs, freshly grated Parmesan, chopped parsley, olive oil, garlic powder, and a pinch of salt. Use a fork to toss everything together until the mixture looks like damp, clumpy sand — golden from the cheese, flecked with green from the parsley. The olive oil helps it bind just enough to stay on the shrimp without turning pasty.

  • Step 5: Add the Crust

Step 5: Add the Crust

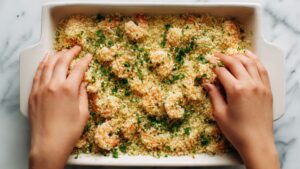
Spoon the parmesan-panko mixture evenly over the top of the shrimp, using your fingertips to press it down very gently into an even, compact layer. You want full coverage — from edge to edge — so that every shrimp gets its share of that golden crust. Don’t press hard enough to compact it into a paste; light pressure is all you need. The layer should look textured and snowy-golden before it goes into the oven.

  • Step 6: Bake Until Golden

garlic parmesan baked shrimp - Spoonista

Slide the baking dish into the preheated 425°F (220°C) oven on the center rack. Bake for 10–12 minutes, until the shrimp are opaque and pink throughout and the parmesan crust is deeply golden brown and visibly crisp. You’ll hear a gentle sizzle from the butter base — that’s exactly what you want. If the crust hasn’t browned to your satisfaction at 12 minutes, switch the oven to broil for the final 60–90 seconds (watching closely — it can go from perfect to over-browned fast). The shrimp are done when they’ve curled into a loose “C” shape; an “O” shape means they’re overcooked.

  • Step 7: Finish and Plate

garlic parmesan baked shrimp - Spoonista

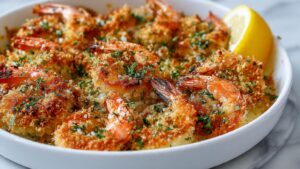
Pull the dish from the oven and let it rest for just 2 minutes — the shrimp continue cooking slightly from residual heat, and this brief pause lets the crust firm back up if it softened at the edges. Scatter extra chopped fresh parsley over the top, add a pinch of flaky sea salt if you have it (it makes everything taste brighter), and nestle a few lemon wedges around the edges of the dish. Serve immediately — this dish does not improve with time, and the crust is at peak crispiness in the first 10 minutes out of the oven.

Notes

Storage: Transfer any leftovers to an airtight container and refrigerate for up to 2 days. The crust will soften as it sits — that’s unavoidable — but the flavor is still wonderful.

Freeze? Not recommended. Shrimp texture degrades significantly after freezing once cooked, and the crust won’t survive the process.

Reheating: The best way to revive this dish is a hot oven or air fryer — not a microwave, which turns the shrimp rubbery and the crust soggy. Spread the leftovers in a single layer on a sheet pan and reheat at 375°F (190°C) for 5–6 minutes, or in an air fryer at 370°F (188°C) for 3–4 minutes. The crust won’t be as crispy as fresh, but it’s significantly better than the microwave version.

Nutrition

  • Calories: ~285 calories
  • Sugar: <1g
  • Sodium: 543mg
  • Fat: 23g
  • Saturated Fat: 5g
  • Carbohydrates: 12g
  • Fiber: 0.5g
  • Protein: 41g
  • Cholesterol: ~195mg

Ingredient Tips:

  • Shrimp size matters: Use 21–25 count (large) shrimp. Smaller shrimp cook too fast and can turn rubbery before the crust browns; larger shrimp give you more margin. Jumbo (16–20 count) also work but may need 2 extra minutes.
  • Fresh vs. frozen shrimp: Honestly, frozen large shrimp thawed properly (cold water, 5–7 minutes) are excellent here. Just dry them aggressively — any surface water is the enemy of crisp.
  • Parmesan quality: Freshly grated from a block is the move. Pre-grated Parmesan often has anti-caking agents that prevent it from melting and browning the way you want.

Make-Ahead Instructions:

  • You can mix the garlic butter base and the parmesan-panko topping up to 24 hours ahead and store both separately in the fridge.
  • Arrange the shrimp in the butter base up to 30 minutes before baking, cover with plastic wrap, and refrigerate. Add the topping just before it goes into the oven.

Get Fresh Recipes from Spoonista

Got Questions? Here's What You're Asking (FAQ)

Can I make this recipe ahead of time?

Yes, partially. Mix the garlic butter base and parmesan crust up to 24 hours in advance and refrigerate them separately. Assemble the shrimp in the dish up to 30 minutes before baking, but don’t add the crust until right before it goes in the oven — otherwise it absorbs moisture and loses that crunch.

Transfer to an airtight container and refrigerate for up to 2 days. The crust softens over time, but the flavor holds well. Reheat in the oven at 375°F rather than the microwave to preserve as much texture as possible.

I’d skip it. Cooked shrimp don’t freeze and thaw well — the texture becomes watery and slightly spongy, and the parmesan crust won’t survive either. This dish is genuinely better made fresh to order, and since it only takes 20 minutes, it’s worth it.

Pecorino Romano is the closest swap — salty, nutty, and melts similarly. Asiago works too, though it’s milder. For a dairy-free version, use 2 tablespoons of nutritional yeast mixed into the panko along with a little extra olive oil — it won’t crust the same way, but it adds a savory depth.

Look for two things: the shrimp should be pink and opaque all the way through (no grey-white translucency), and they should have curled into a loose “C” shape. If they’ve curled into a tight “O,” they’re overcooked. The crust should be visibly golden brown — not pale, not dark. If your oven runs cool, the crust may look pale while the shrimp are fully cooked; a 60-second broil fixes this quickly.

Absolutely. Halving works perfectly in an 8×8-inch dish. For doubling, use two separate 9×13-inch dishes rather than trying to pack everything into one — crowded shrimp steam instead of roast, and you’ll lose the crispy crust you’re going for. Bake time stays the same.

Most likely the shrimp weren’t dried well enough before going into the dish, or your oven wasn’t fully preheated. Wet shrimp release steam that turns the crust soggy. Pat them very dry, make sure your oven is hot before the dish goes in, and don’t cover the dish at any point during baking.

Angel hair pasta, crusty bread, arugula salad, roasted asparagus, or lemony broccolini are all excellent. The garlic butter sauce in the baking dish works beautifully as a pasta sauce — just toss cooked noodles straight into the dish.

It can be easily! Swap regular panko for certified gluten-free panko breadcrumbs. Everything else in the recipe is naturally gluten-free. Double-check your Parmesan label just in case, but it should be fine.

Double the red pepper flakes in the butter base, and add a pinch directly to the panko crust as well. You can also add a few dashes of your favorite hot sauce to the butter mixture, or finish the finished dish with thin-sliced fresh chili on top.

Equipment Needed

Essential:

Optional but Helpful:

  • Silicone pastry brush — great for coating the dish evenly with the butter base before laying in the shrimp
  • Oven thermometer — useful if your oven runs hot or cold; this recipe needs real 425°F heat for a proper crust

Serving Suggestions

As a Dinner:

  • Over angel hair pasta tossed with a little extra olive oil and lemon juice — the garlic butter in the baking dish becomes an instant sauce; just tilt the dish and pour.
  • With crusty sourdough bread for scooping up all that garlicky, buttery pan sauce (honestly, sometimes this is the best part).
  • Over a simple arugula salad dressed with lemon and olive oil — the peppery greens balance the richness of the shrimp beautifully.
  • Alongside roasted asparagus or lemony broccolini for a complete, light weeknight plate.

As an Appetizer:

  • Serve directly in the baking dish with toothpicks and lemon wedges on a spread table — it looks dramatic and guests absolutely love serving themselves.
  • Pair with a cold, crisp glass of Pinot Grigio or Vermentino — the citrus notes in both wines echo the lemon in the dish perfectly.
  • For non-alcoholic pairings, a sparkling water with lemon and fresh herbs is refreshing alongside the richness of the butter and cheese.

Related Recipes

Everly Brooks spoonista food blog-vegan recipes

Nice To Meet You !

I’m Everly Brooks and I ♡ wholesome vegan food. Food blogger and recipe creator—Spoonista is my passion, sharing budget-friendly vegan eats with you all!

Made this recipe? Tag @spoonista on Instagram—we’d love to see it!

LEAVE A COMMENT

Everly Brooks spoonista food blog-vegan recipes

HI! I'M

Everly

Welcome to Spoonista, where I share wholesome, budget-friendly vegan & vegetarian recipes that make plant-based cooking easy and delicious for everyone.

Follow Us

Signup For Updates

Get our latest and most-loved recipes — totally free!