
Homemade Vanilla Ice Cream

This homemade vanilla ice cream recipe is a simple, classic treat. It brings summer vibes right to your kitchen. It's creamy, mellow, and made with familiar ingredients found at Walmart or Whole Foods. The method is easy and fun for the whole family. It's great for busy weeknights, backyard barbecues, or a quiet dessert after school. This recipe fits any occasion.

This post may contain affiliate links. Please read my disclosure policy.

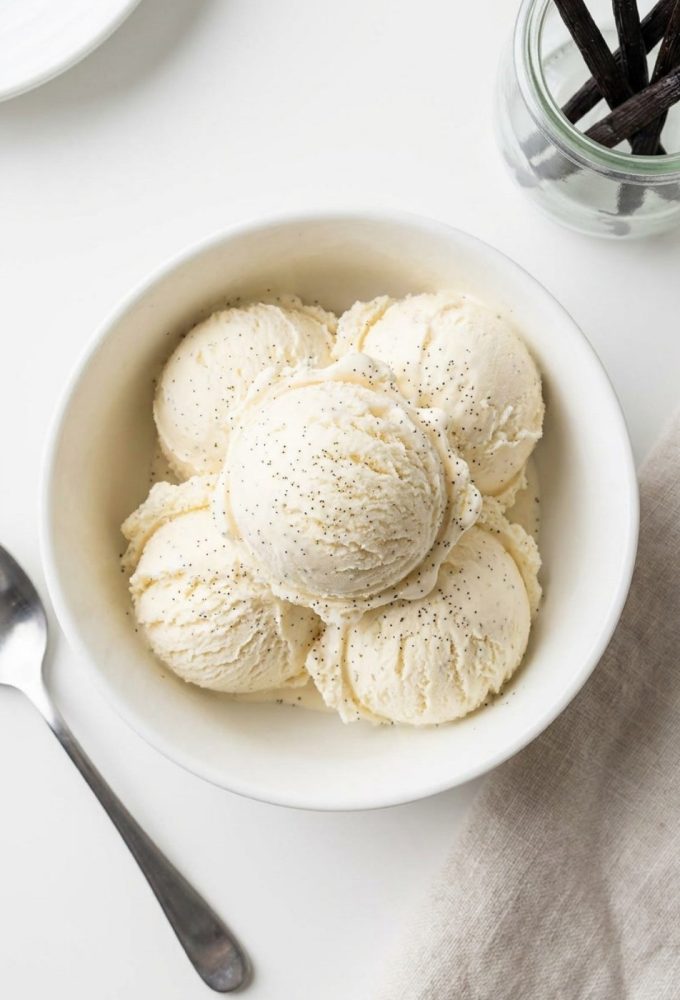
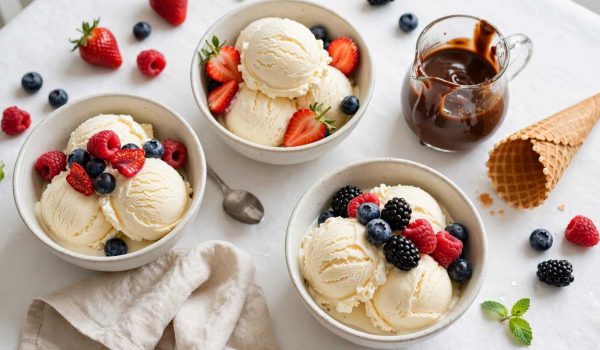
Overhead shot of homemade vanilla ice cream in a white bowl.

Imagine summer afternoons on the porch, kids with sticky fingers, and gossip carried on warm breezes. A bowl of cold, creamy ice cream turns these moments into cherished memories. This recipe aims to bring that simple joy into your home with minimal effort.

Readers will find a clear, foolproof method for the best homemade ice cream. It stays smooth scoop after scoop. Whether you prefer a classic custard or a quick homemade ice cream without eggs, both paths lead to rich, vanilla-forward results that taste like the local creamery.

The proportions are tested against common pastry basics used by home cooks and trusted test kitchens like America’s Test Kitchen and Cook’s Illustrated. The steps use tools found in most kitchens: a basic ice cream maker or a no-churn alternative for those who prefer to skip special equipment.

My Story Behind This Recipe

She recalls warm summer nights filled with laughter. Kids would dive into bowls after a messy backyard barbecue. Plates were sticky, but a simple scoop of vanilla ice cream made everyone smile.

Her first try ended in icy, grainy ice cream. The stove was a mess, and she had to raid the fridge for more cream. These mistakes taught her the importance of chilling times and a smooth texture.

Kids loved plain spoonfuls of ice cream between bites of pie. This feedback led to two recipes: a custard-style for depth and an eggless version for busy nights. Both aim to be a simple, reliable vanilla ice cream.

She made small tweaks based on real life. She balanced the vanilla flavor so it’s perfect but not overpowering. She also made it quicker, so it fits into a busy evening. The result is a recipe that feels like a family memory and tastes like a classic vanilla ice cream.

Why You'll Love This Recipe

This recipe is warm, simple, and perfect for busy kitchens. It shows how to make creamy vanilla ice cream at home with everyday ingredients. The result tastes richer than many store pints and keeps guests asking for seconds.

  • Simple ingredients you likely already have.
  • Creamy texture that beats store-bought.
  • Flexible: make it with or without eggs.
  • Fast hands-on time, great for busy weeknights.
  • Ideal base for endless toppings and mix-ins.
  • Kid-approved and family-friendly.
  • Budget-friendly compared to artisan pints.
  • Makes a memorable homemade gift for neighbors.

What makes this the best homemade ice cream for many cooks is the balance of flavor and ease. A good batch starts with quality dairy, a clear vanilla choice, and basic technique. These three things lift a simple recipe into something special.

What Is Homemade Vanilla Ice Cream?

Vanilla ice cream has long European roots and grew into a global favorite. It often serves as the benchmark by which other flavors are judged. Families reach for it at birthdays, barbecues, and holiday pies.

The heart of great homemade vanilla ice cream is straightforward: real vanilla, fresh cream, and careful chilling. Using vanilla bean will add flecks and aroma. Pure extract keeps things quick and consistent.

There are two main paths to the final scoop. Custard-based recipes use egg yolks cooked with cream and sugar for a silky, custardy mouthfeel. Eggless methods rely on whipped cream, condensed milk, or a simple milk-and-sugar base for a lighter, faster result. Each method can yield a creamy vanilla ice cream; choice depends on taste, time, and equipment.

Everything You Need to Make This Recipe

This recipe is simple and uses common ingredients. You’ll need heavy cream, whole milk, sugar, vanilla, and a pinch of salt. You can also add stabilizers or mix-ins for extra flavor.

Homemade vanilla ice cream served in a lifestyle summer setting.

What Each Ingredient Actually Does

  • Heavy cream adds richness and a smooth texture. It makes the ice cream feel luxurious.
  • Whole milk makes the ice cream scoopable. Using lower-fat milks will make it lighter.
  • Sugar sweetens and prevents the ice cream from becoming too hard. It keeps it soft and creamy.
  • Vanilla bean or extract gives the ice cream its flavor. Beans add specks and aroma, while extract is quick and easy.
  • Egg yolks, used in the custard method, make the ice cream silky. They help it feel velvety.
  • Corn syrup, glucose prevent iciness. They make the ice cream smooth.
  • A pinch of salt enhances flavors and balances sweetness. It’s a small but important addition.

Don't Have It? Here's What to Use Instead

No heavy cream? Mix half-and-half with a spoonful of mascarpone. It keeps the richness without needing to go shopping.

No whole milk? Use reduced-fat milk for a lighter texture. It’s less indulgent but still delicious.

Out of vanilla extract? Use a vanilla bean if you have one. Pure extract is the best substitute. Imitation vanilla is okay but not as good.

Want to make ice cream without eggs? Use sweetened condensed milk for a no-cook base. Gelatin or cornstarch can add silkiness.

Need a different sweetener? Try honey or maple syrup. They change the flavor and texture, so adjust as needed.

Tip: For a no-churn ice cream without eggs, mix sweetened condensed milk with whipped heavy cream.

Tip: To reduce ice crystals, add a tablespoon of light corn syrup or 1 teaspoon of vodka.


How to Shop for This Recipe Like a Pro

One smart shopping trip can make a big difference. Focus on quality items like pure vanilla and full-fat dairy. This makes your homemade vanilla ice cream and other ingredients stand out.

How to Pick the Perfect Vanilla

Choose pure vanilla extract or whole vanilla beans. Madagascar Bourbon beans offer a warm, rich aroma.

Read labels carefully. Pure vanilla extract should list vanilla bean extractives. Avoid “natural flavor” as it’s vague.

For beans, look for plump, oily pods with no cracks. A single bean can elevate a classic vanilla ice cream’s flavor.

How to Spot a Good Dairy

Buy pasteurized heavy cream and whole milk. Brands like Organic Valley and Horizon are reliable. Or, choose a trusted local dairy for fresher taste.

Check expiration dates and choose the freshest cream available. Fresh cream improves texture and richness in homemade ice cream.

If possible, avoid ultra-pasteurized cream for a slightly better mouthfeel. Ultra-pasteurized still works in a pinch.

The Smartest Way to Shop for This Recipe

Stock up when heavy cream is on sale; it freezes well for later batches of classic vanilla ice cream.

Invest in a small bottle of pure vanilla extract. It lasts and tastes better than imitation over time.

For quick toppings, pick seasonal fruit, good chocolate chips, or a jar of store-bought caramel for easy finishing touches.

5 Simple Steps for Perfect Homemade Vanilla Ice Cream

Follow five easy steps to make delicious homemade vanilla ice cream. This recipe works for both custard and no-churn methods. Choose the method that fits your schedule and tools.

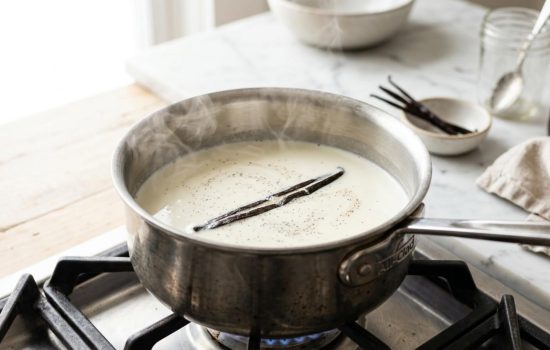
Heat and infuse

Warm whole milk and heavy cream with a vanilla bean or extract. Heat until steam rises, but don’t boil.

Whole milk and heavy cream warming with a vanilla bean in a saucepan.

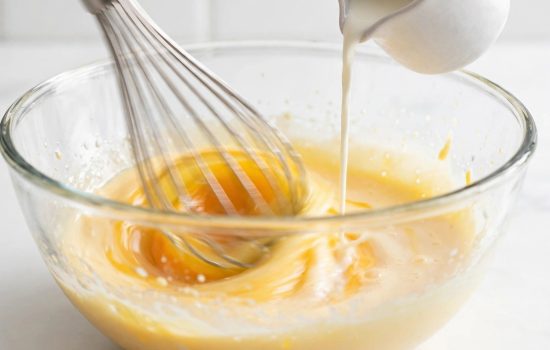
Whisk and temper.

For custard, whisk egg yolks, then add hot milk slowly. Return to low heat and cook until thick.

Whisking egg yolks while slowly tempering with hot milk.

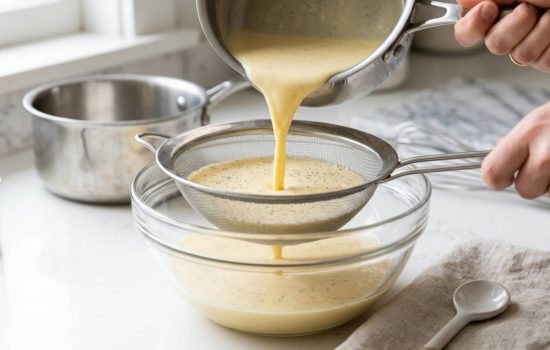
Chill the base.

Cool the custard in an ice bath, then refrigerate for hours or overnight. A cold base makes the ice cream creamy.

Straining vanilla custard base through a fine-mesh sieve into a bowl

Churn.

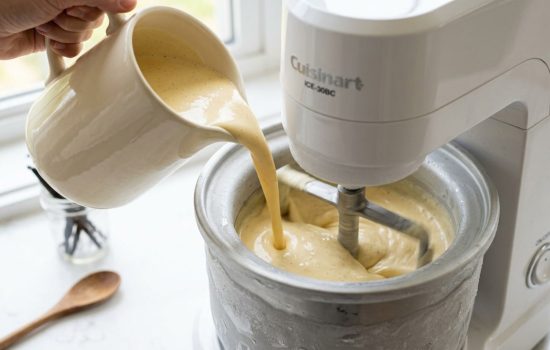
Pour the cold base into your ice cream maker. Churn as directed until it’s soft-serve ready. This step adds air and smoothness.

Pouring chilled vanilla custard base into an ice cream maker.

Freeze to firm up.

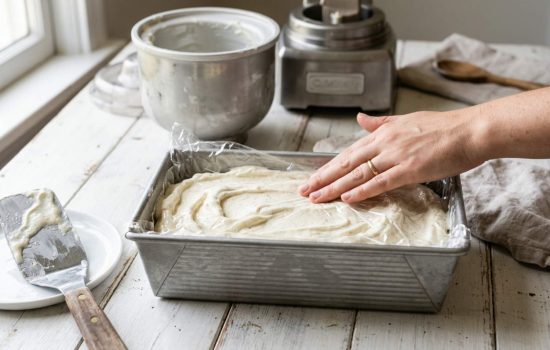
Move churned ice cream to a shallow container. Press plastic wrap on top to prevent crystals. Freeze until scoopable.

Pressing plastic wrap onto churned vanilla ice cream in a shallow container.

What You'll Need in the Kitchen

Before starting this homemade vanilla ice cream adventure, gather a few simple tools. The right gear keeps the process calm and the results smooth. A short prep saves time and fuss when the family wants a scoop fast.

The Only Tools That Actually Matter

Keep it practical. A medium saucepan and a whisk handle the warm custard stage. Mixing bowls and a spatula make folding and chilling tidy.

No [Tool]? No Problem — Use This Instead

Not everyone owns a machine and that’s okay. There are easy ways to make tasty DIY ice cream at home.

  • For classic no-churn ice cream, whip chilled heavy cream to soft peaks. Fold in sweetened condensed milk and vanilla. Freeze in a shallow container until firm. This method is fast and forgiving.
  • The plastic bag trick works when texture needs coaxing. Freeze the base in a shallow container. Every 30 minutes, whisk vigorously to break up ice crystals. Repeat until set.
  • A hand-churn alternative uses a stand mixer with a chilled bowl. Whip the base often while it chills to mimic the aeration of an ice cream maker. It takes elbow grease, but yields creamy results for DIY ice cream fans.

Read This Before You Start Cooking

Before you start cooking, a quick heads-up can make a big difference. Read the recipe from start to finish before you turn on the stove. Chilling, timing, and prep are key for a smooth, creamy result.

The Mistakes Almost Every Beginner Makes

  • One common mistake is skipping the chill step. A warm custard will freeze with ice crystals, not creaminess. When the recipe asks to temper eggs, do it slowly.
  • Pouring hot milk into eggs too fast can cause a curdled base. Using low-fat milk or cream can lead to disappointment. Full-fat dairy gives your ice cream body and flavor.
  • Overfilling the ice cream maker bowl can prevent proper freezing. Leave room for expansion and churn time.

How to Get Ahead and Save Time

Make the base the night before and chill it well. A cold base churns faster and yields smoother ice cream. Freeze the ice cream maker bowl ahead if your model needs it.

A rock-solid bowl speeds up freezing during churning. Prep mix-ins and toppings in jars for quick assembly. Store leftover base in the fridge for milkshakes or warm it for an affogato-style treat. These small moves can turn your homemade vanilla ice cream plan into the best homemade ice cream in less time.

Let me show you exactly how to make this — grab your saucepan and your biggest mixing bowl.

Print
clock clock iconcutlery cutlery iconflag flag iconfolder folder iconinstagram instagram iconpinterest pinterest iconfacebook facebook iconprint print iconsquares squares iconheart heart iconheart solid heart solid icon
Overhead shot of homemade vanilla ice cream in a white bowl.

Homemade Vanilla Ice Cream


5 Stars 4 Stars 3 Stars 2 Stars 1 Star

No reviews

Description

A creamy, classic vanilla ice cream with real vanilla flavor and a smooth, scoopable texture. Perfect for family gatherings, hot afternoons, or topping warm fruit; easy enough for weeknight dessert.


Ingredients

Units Scale

  Flat lay of all ingredients for homemade vanilla ice cream on white marble.  
  • 2 cups heavy cream
  • 1 cup whole milk
  • 3/4 cup granulated sugar
  • 1 vanilla bean, split and seeds scraped (or 2 tsp pure vanilla extract)
  • Pinch of fine sea salt
  • (Optional for custard) 4 large egg yolks
  • (Optional no-churn) 14 oz sweetened condensed milk
  • Optional mix-ins/toppings: chocolate chips, caramel sauce, fresh berries
 
Instacart Get Recipe Ingredients

Instructions

  1. Heat: Combine milk, cream, sugar, and vanilla bean (seeds + pod) in a saucepan and warm until steam rises. Stir gently to dissolve the sugar.
  2. Temper (custard): Whisk egg yolks in a bowl, slowly add a ladle of hot milk while whisking, then return the mixture to the saucepan and cook until it lightly coats the back of a spoon.
  3. Cool: Strain the base, remove the vanilla pod, and chill in the refrigerator until cold.
  4. Churn: Pour the cold base into an ice cream maker and churn per manufacturer directions until it reaches a soft-serve texture.
  5. Freeze: Transfer to a shallow container, press plastic to the surface, and freeze for at least 4 hours to firm.
  6. No-churn alternative: Whip chilled heavy cream to soft peaks, fold in sweetened condensed milk

Notes

Chill the base thoroughly before churning for the smoothest texture. Use full-fat dairy for the richest results. Try the no-churn method if you don’t own an ice cream maker. Strain the custard base to remove any cooked bits before chilling.

Nutrition

  • Serving Size: 6 Servings
  • Calories: ~330 kcal
  • Sugar: 23 g
  • Sodium: 55 mg
  • Fat: 24 g
  • Saturated Fat: 15 g
  • Carbohydrates: 24 g
  • Fiber: 0 g
  • Protein: 4 g
  • Cholesterol: 145 mg

Something Went Wrong? Let's Fix It Right Now

This guide helps with common texture and flavor issues. It offers simple fixes to save your batch and learn for next time. Follow these tips to achieve the best homemade ice cream, silky and creamy every time.

Why Is It Too Dry, Too Wet, or Too Heavy?

Too dry or icy? Maybe the base wasn’t chilled enough or lacks fat. Chill the mix in an ice bath until very cold before churning. Use at least some heavy cream or stir in a tablespoon of corn syrup. A splash of rum or vodka lowers the freezing point and softens ice crystals.

Too wet or runny? This usually means under-churned or not fully frozen. Churn a bit longer. Transfer to a shallow container and freeze several hours to firm up. If time is tight, use an ice bath to cool the container faster.

Too heavy or greasy? This is from too much cream or over-churning. Cut back on heavy cream next batch. Shorten the churn time and stop when the mix holds soft peaks.

Why Didn't It Brown, Rise, or Cook Through?

For custard-style bases, “didn’t cook through” means the mix never reached the proper thickening range. Heat gently to about 170–175°F while stirring. Use a reliable thermometer to avoid undercooking.

“Didn’t brown” is not usually needed for classic vanilla. If caramel or toasted mix-ins were planned, use a lower pan temperature and watch closely to avoid burning.

It's Too Salty or Totally Bland — Here's the Fix

If the batch is too salty, dilute by making a fresh unsalted base and folding them together until salt balance improves. Taste as you blend to avoid overcorrecting.

If it tastes bland, add a touch more vanilla extract or fold in vanilla bean paste for depth. A small pinch of salt brightens flavor. Use whole vanilla beans or high-quality extract for the best homemade ice cream flavor.

The Texture Is Off — This Is Exactly Why

Large ice crystals mean the base warmed too slowly or was under-churned. Cool the base fast in an ice bath and churn properly next time.

Grainy texture often comes from overcooked eggs or a scrambled custard. Temper yolks slowly when adding hot milk and strain the base through a fine sieve before chilling.

Chalky mouthfeel can follow from low-quality dairy or powdered mixes. Use fresh whole milk and high-fat cream for a true creamy vanilla ice cream. Small changes in technique yield big improvements.

Get Fresh Recipes from Spoonista

Got Questions? Here's What You're Asking

Can you make this without an ice cream maker?

Yes. You can make simple vanilla ice cream without one. Use whipped cream and sweetened condensed milk for a firm texture. For a lighter ice cream, freeze and whisk every 30 minutes until smooth.

Keep it in an airtight container in the freezer. For the best taste and texture, enjoy it within 1–2 weeks.

You can, but it won’t be as creamy. Adding mascarpone or a bit of cream can make it richer. You can also use stabilizers for a better mouthfeel when making ice cream without eggs.

No. Pure vanilla extract works great and keeps things simple. Use beans for a deeper aroma and flecks in your homemade vanilla ice cream.

Yes. Chill the base well before freezing and churn correctly. Adding a tablespoon of corn syrup or a splash of vodka helps prevent ice crystals without changing the flavor.

Yes. Kids can help with scraping vanilla pods, stirring mix-ins, and decorating scoops. Making simple vanilla ice cream is a fun, safe activity with adult supervision.

Yes. Use full-fat coconut milk and tapioca starch for a creamy texture. It will have a light coconut flavor that goes well with fruit or chocolate.

Straining removes cooked bits and pod fragments for a smooth texture. This step is important for both custard and quick ice cream without eggs.

Yes. Freezing in small tubs makes thawing quick and portion control easy. Small containers also reduce freezer burn.

Add crunchy or soft mix-ins in the last few minutes of churning. If you don’t have a churner, fold mix-ins into the soft-serve stage before freezing to keep the texture right.

What to Serve With Homemade Vanilla Ice Cream

Vanilla ice cream is incredibly versatile. It goes well with warm pies, fresh fruit, and chocolate. A scoop of creamy vanilla ice cream can turn simple desserts into something special. It’s great as a base for different textures and temperatures.

Here are some easy ideas to make a complete meal or a fun self-serve bar.

The Best Side Dishes to Serve Alongside

  • Warm fruit crisps or cobblers, like peach or mixed berry, served hot with a scoop of creamy vanilla ice cream.
  • Brownies or chocolate lava cake for a hot-and-cold contrast that feels indulgent and easy to make.
  • Fresh fruit salad with a squeeze of lemon or orange for a bright, lighter option next to classic vanilla ice cream.
  • Grilled peaches or pineapple slices brushed with a little butter and brown sugar for a smoky summer pairing.

Sauces & Toppings That Take It to the Next Level

  • Hot fudge or melted chocolate mixed with a splash of cream makes a quick, glossy sauce.
  • Salted caramel, either made in the microwave or simmered on the stove, adds a buttery flip to creamy vanilla ice cream.
  • Berry compote or coulis brightens the plate; cook berries with a touch of sugar and lemon, then strain if desired.
  • Toasted nuts, crushed cookies, and mini chocolate chips give crunch and contrast to soft scoops.
  • A shot of hot espresso poured over a scoop turns it into an instant affogato for grown-up guests.

How to Turn It Into a Full Table Spread

Set out bowls of homemade ice cream toppings: chopped nuts, sprinkles, crushed cookies, cherries, and mini candies.

Place sauces in squeeze bottles or small pitchers—hot fudge, caramel, and berry sauce make choices easy.

Offer cones, wafers, and small bowls so guests can choose their vessel. Label each flavor and sauce if you have several types of ice cream.

Add grilled fruits and warm pastries on a nearby platter to encourage mixing and matching with classic vanilla ice cream.

Round out the spread with simple drinks like iced tea, lemonade, or cold brew coffee to match the desserts.

With a few warm components and a basket of toppings, homemade ice cream toppings become the star. The result is an inviting, low-effort dessert table that feels thoughtful and festive.

Still Hungry? You'll Love These Too

Everly Brooks spoonista food blog-vegan recipes

Nice To Meet You !

I’m Everly Brooks and I ♡ wholesome vegan food. Food blogger and recipe creator—Spoonista is my passion, sharing budget-friendly vegan eats with you all!

Made this recipe? Tag @spoonista on Instagram—we’d love to see it!

LEAVE A COMMENT

Everly Brooks spoonista food blog-vegan recipes

HI! I'M

Everly

Welcome to Spoonista, where I share wholesome, budget-friendly vegan & vegetarian recipes that make plant-based cooking easy and delicious for everyone.

Follow Us

Signup For Updates

Get our latest and most-loved recipes — totally free!

Popular Recipes

The Spoonista Meal Prep Bible Ebook

The Spoonista Meal Prep Bible

Discover the simple system I use to prep meals faster, cut down kitchen stress, and make everyday cooking feel easy and doable.